
文章
Rust Web开发 - 3
实现RESTful风格的API
部分内容超过 Notion API 单页读取上限,已尽力加载可访问内容。
目录
实现Restful API#
REST API有四种请求类型:GET、PUT、POST和DELETE,分别对应着对服务端数据的查询,更新,新增和删除。在前面章节我们已经实现了GET请求,这一章将完善后面的(PUT、POST和DELETE)请求。 由于没有使用数据库,为了能够模拟整个数据流转的流程,我们会初始化数据到服务器的内存中,然后客户端通过REST API 对我们服务求内存的数据进行更新、新增以及删除。
1. 从内存读取数据#
为了简单进行查询,我们使用HashMap作为内存数据(当然也能使用Vector),使用HashMap是因为查询操作简单。
首先创建一个Store结构体用于存储出我们的Questions
struct Store {
    questions: HashMap<QuestionId, Question>,
}
为了便于操作Store我们设计以下三个方法:
- new
- init
- add_question 方法的实现如下:
impl Store {
    fn new() -> Self {
        Store {
            questions: Self::init(),
        }
    }

    fn init() -> HashMap<QuestionId, Question> {
        //.....
    }


    fn add_question(mut self, question: Question) -> Self {
        self.questions.insert(question.id.clone(), question);
        self
    }
}
这里要实现这些trait,不然会编译不通过
#[derive(Serialize, Debug, Clone, PartialEq, Eq, Hash)]
struct QuestionId(String);
关于上面的init方法我们有两种实现方式,一种直接硬编码一个Question对象初始化,另一种是读取json配置文件数据初始化。现在先使用第一种方式,下一节再使用第二种方式
    fn init(self) -> Self {
        let question = Question::new(
            QuestionId::from_str("1").expect("Id not set"),
            "How?".to_string(),
            "Please help!".to_string(),
            Some(vec!["general".to_string()])
        );
        self.add_question(question)
    }
1.1 从文件读取数据到内存#
要从json文件读取数据,
- 首先我们要在项目的根目录也就是Cargo.toml的同级目录下创建一个
question.json,文件内容如下:
{
"1" : {
"id": "1",
"title": "How?",
"content": "Please help!",
"tags": ["general"]
}
}
2. 添加`serde_json = "1.0"`依赖 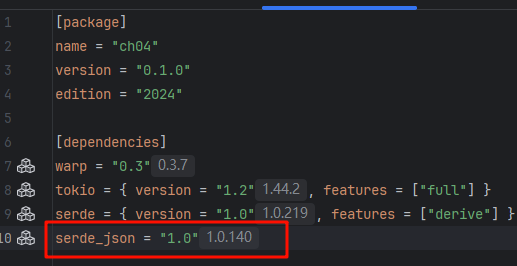 3. 更新我们的init方法 rust
fn new() -> Self {
Store {
questions: Self::init(),
}
}
fn init() -> HashMap<QuestionId, Question> {
    let file = include_str!("../question.json");
    serde_json::from_str(file).expect("can't read questions.json")
}
```
4. 实现反序列化trait
#[derive(Clone, Debug, Deserialize, Serialize)]
struct Question {
    id: QuestionId,
    title: String,
    content: String,
    tags: Option<Vec<String>>,
}

#[derive(Serialize, Deserialize, Debug, Clone, PartialEq, Eq, Hash)]
struct QuestionId(String);
1.2 创建内存数据操作的路由#
上一节我们定义了从文件读取json数据的的init方法,但是真正init方法被调用是在new方法中,而在哪里调用new方法呢,我们现在暂时放在main方法中:
async fn main() {
    let store = Store::new();
    //***省略
}
现在我们需要把新创建的对象传到路由函数(因为最后我们需要使用RESTful的API来操作store,RESTful API的处理是由路由函数去过滤分发的)。在传递到路由函数前,我们需要创建过滤器,用来保存每个store,然后将其传递给每个需要访问的路由。
async fn main() {
    let store = Store::new();
    let store_filter = warp::any().map(move || store.clone());
    // 省略
    warp::serve(routes)
    .run(([127, 0, 0, 1], 3030))
    .await;
}
对于上面的代码可以这么解读:
- 使用warp::any, 这个any过滤器将匹配任何请求,所以这条语句会评估所有请求。
- 通过.map里面的Rust闭包。move关键字表示通过值获取,这说明它将值移动到闭包内部,并获得他们的所有权。
- 返回一个clone的store,这样每个使用这个Warp过滤器的函数都能访问这个store。通常情况下,不需要再这里clone store,因为我们只有一个路由用到它。但是因为想创建多个可以访问store的路由函数,所以需要clone它。 下一步将过滤器应用到路由函数
async fn main() {
    let store = Store::new();
    let store_filter = warp::any().map(move || store.clone());
    let cors = warp::cors()
        .allow_any_origin()
        .allow_header("content-type")
        .allow_methods(&[Method::PUT, Method::DELETE, Method::GET, Method::POST]);

    let get_questions = warp::get()
        .and(warp::path("questions"))
        .and(warp::path::end())
        .and(store_filter)
        .and_then(get_questions)
        .recover(return_error);

    let routes = get_questions.with(cors);

    warp::serve(routes)
        .run(([127, 0, 0, 1], 3030))
        .await;
}
这里我们运行代码,会编译报错
error[E0593]: function is expected to take 1 argument, but it takes 0 arguments
   --> src\main.rs:126:10
    |
78  | async fn get_questions() -> Result<impl warp::Reply, warp::Rejection> {
    | --------------------------------------------------------------------- takes 0 arguments
...
126 |         .and_then(get_questions)
    |          ^^^^^^^^ expected function that takes 1 argument
    |
    = note: required for `fn() -> impl Future<Output = Result<impl Reply, Rejection>> {get_questions}` to implement `warp::generic::Func<(Store,)>`
为什么会报错呢?是因为:
在 warp 框架中,当你使用 .and() 方法把不同的过滤器(filter)串联起来时,前面过滤器的输出会作为参数传递给后面的过滤器或处理函数。
我们看看 .and_then(get_questions) 这行前面的过滤器链:
let get_questions = warp::get()
    .and(warp::path("questions"))
    .and(warp::path::end())
    .and(store_filter) // <--- 这个过滤器产生并传递了一个值!
    // .and_then(get_questions) // <--- 错误发生在这里
这里的 store_filter 是这样定义的:warp::any().map(move || store.clone())。这个过滤器的作用是获取 store 的一个复制品(clone),然后把它传递到过滤器链的下一步。
所以,当执行到 .and_then(get_questions) 时,前面的过滤器链已经准备好把一个 Store 类型的参数传递给紧随其后的 get_questions 函数。
然而,你的 get_questions 函数的定义是 async fn get_questions() (在 src\main.rs:78 行),它被定义为不接收任何参数。
这就造成了不匹配(mismatch):warp 过滤器链期望把一个 Store 对象作为参数传给 get_questions,但 get_questions 函数的签名(signature)却没有定义任何参数来接收它。编译器检测到这个不一致,于是报错。
解决方法是将get_questions方法修改如下函数签名
async fn get_questions(store: Store) -> Result<impl warp::Reply, warp::Rejection> {
    let question = Question::new(
        QuestionId::from_str("1").expect("No id provided"),
        "First Question".to_string(),
        "Content of question".to_string(),
        Some(vec!("faq".to_string())),
    );

    match question.id.0.parse::<i32>() {
        Err(_) => {
            Err(warp::reject::custom(InvalidId))
        }
        Ok(_) => {
            Ok(warp::reply::json(
                &question
            ))
        }
    }
}
由于我们可以从这个参数store获取Store对象的值了,所以下面的question的初始化也不需要了。最后代码可以修改成如下:
async fn get_questions(store: Store) -> Result<impl warp::Reply, warp::Rejection> {
    let res = store.questions.values().cloned().collect();
    Ok(warp::reply::json(&res))
}
我们返回的是question的列表。
1.3 解析查询参数#
添加查询参数是为了给路由更多的规范,给用户请求的更多自定义选择。添加查询参数不需要创建路由,只需要添加一个额外的过滤器即可,如下所示:
 启动应用,编译器会出现如下错误:
error[E0593]: function is expected to take 2 arguments, but it takes 1 argument
   --> src\main.rs:112:10
    |
78  | async fn get_questions(store: Store) -> Result<impl warp::Reply, warp::Rejection> {
    | --------------------------------------------------------------------------------- takes 1 argument
...
112 |         .and_then(get_questions)
    |          ^^^^^^^^ expected function that takes 2 arguments
    |
    = note: required for `fn(Store) -> impl Future<Output = Result<impl Reply, Rejection>> {get_questions}` to implement `warp::generic::Func<(_, Store)>`
错误提示告诉我们get_questions函数需要2个参数,我们现在方法只有一个,因此我们还要添加一个参数:
 出于测试考虑,这里还添加了一个println打印参数,现在启动应用,打开浏览器访问http://localhost:3030/questions?start=1&end=200
编辑器的控制台会有如下输出:
出于测试考虑,这里还添加了一个println打印参数,现在启动应用,打开浏览器访问http://localhost:3030/questions?start=1&end=200
编辑器的控制台会有如下输出:
 这里控制台输出的是一个带有键值对的hash map,内容都是字符串。但是有时我们想要的是数字,Rust内置了一个可用的解析方法,解析步骤如下:
- 检查参数hash map是否包含值。
- 如果有,尝试从起始的字符解析出数字。
- 如果失败了,则返回一个错误。 可以使用match来检查这个hashmap是否有期待的值:
async fn get_questions(params: HashMap<String, String>,
                        store: Store) -> Result<impl warp::Reply, warp::Rejection> {
    //println!("{:?}", params);
    match params.get("start") {
        Some(start) => println!("{}", start),
        None => println!("No start value"),
    }
    let res: Vec<Question> = store.questions.values().cloned().collect();
    Ok(warp::reply::json(&res))
}
我们可以化简以下这个判断
async fn get_questions(params: HashMap<String, String>,
                       store: Store) -> Result<impl warp::Reply, warp::Rejection> {
    //println!("{:?}", params);
    /*match params.get("start") {
        Some(start) => println!("{}", start),
        None => println!("No start value"),
    }*/
    if let Some(n) = params.get("start") {
        println!("{}", n)
    }
		//省略
}
接下来我们可以尝试将包含的字符串转解析成数字
async fn get_questions(params: HashMap<String, String>,
                        store: Store) -> Result<impl warp::Reply, warp::Rejection> {
    //println!("{:?}", params);
    /*match params.get("start") {
        Some(start) => println!("{}", start),
        None => println!("No start value"),
    }*/
    if let Some(n) = params.get("start") {
        println!("{:?}", n.parse::<usize>())
    }
    //省略
}
如果解析失败,就返回错误:
async fn get_questions(params: HashMap<String, String>,
                        store: Store) -> Result<impl warp::Reply, warp::Rejection> {

    let mut start = 0;
    if let Some(n) = params.get("start") {
        start = n.parse::<usize>().expect("Could not parse start");
    }
    println!("{}", start);
    //....
}
如果我们start传入的请求参数不是一个数字,就会报错如下:
warning: `ch04` (bin "ch04") generated 3 warnings
    Finished `dev` profile [unoptimized + debuginfo] target(s) in 0.16s
     Running `target\debug\ch04.exe`

thread 'tokio-runtime-worker' panicked at src\main.rs:86:36:
Could not parse start: ParseIntError { kind: InvalidDigit }
stack backtrace:
   0: std::panicking::begin_panic_handler
             at /rustc/05f9846f893b09a1be1fc8560e33fc3c815cfecb/library\std\src\panicking.rs:695
   1: core::panicking::panic_fmt
             at /rustc/05f9846f893b09a1be1fc8560e33fc3c815cfecb/library\core\src\panicking.rs:75
   2: core::result::unwrap_failed
添加了请求参数以后,会导致很多错误,为了解释各种错误,可以把这个逻辑移到自己的函数中,并添加错误类型和处理方式。
1.4 返回自定义错误#
现在我们已知有两种错误类型:
- 参数类型解析错误
- 参数缺失start或者end 我们暂时可以定义以下枚举:
#[derive(Debug)]
enum Error {
    ParseError(std::num::ParseIntError),
    MissingParameters,
}
定义完了错误还没完,要想能在代码中实现这些自定义错误,还需要执行两个步骤:
- 实现Display trait,这样Rust就知道如何将错误格式化为字符串。
- 在错误中实现Warp的Reject trait,这样就可以在一个Warp路由函数中返回。
impl Display for Error {
    fn fmt(&self, f: &mut Formatter<'_>) -> std::fmt::Result {
        match *self {
            Error::ParseError(ref err) => {
                write!(f, "Cannot parse parameter: {}", err)
            },
            Error::MissingParameters => write!(f, "Missing parameter")
        }
    }
}

impl Reject for Error {}
Reject这个空的实现足以让Warp在路由函数中接受定义的错误,现在还有两部分缺失:
- 在自身函数中提取参数逻辑。
- 在get_questions路由函数中调用函数,并让错误传递至return_error函数,并在那里进行处理。 为了便于参数处理,我们抽象出Pagination,#[derive(Debug)]是为了打印这个结构体内容,便于测试
#[derive(Debug)]
struct Pagination {
    start: usize,
    end: usize,
}
提取Pagination参数
fn extract_pagination(params: HashMap<String, String>) -> Result<Pagination, Error> {
    if params.contains_key("start") && params.contains_key("end") {
        return Ok(Pagination {
            start: params.get("start").unwrap().parse::<usize>().map_err(Error::ParseError)?,
            end: params.get("end").unwrap().parse::<usize>().map_err(Error::ParseError)?,
        });
    }
    Err(Error::MissingParameters)
}